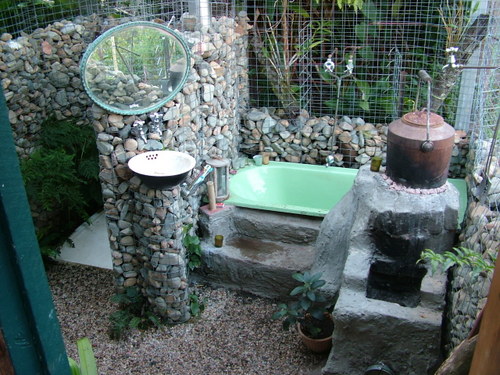
So, this one is for you Angus, and for the others who have asked for more detail about building the bathroom “Worth the 30 Years’ Wait”.
Like everything permaculture, the first step is to “Observe and Interact“. We didn’t do that.
Our house has a beguiling view to the south, down a valley and off into the distance. Some mornings, with mist hanging in the valley, it is magnificent. It seduced me into forgetting everything I knew about solar energy and aspect. So we built our main verandah facing south with the kitchen leading onto it, the kitchen roof sloping south, and the wood stove in the kitchen, and … can you see where this is going? In our hemisphere, a solar hot water system has to go on a north facing roof to work effectively. To be wood stove boosted, the wood stove needs to be pretty directly under it, but our wet-back wood stove was on the other side. The design was all wrong. You can’t shift the sun.
So we made do with a shower with solar heated water, that wasted too much water waiting for the hot to get through and that often didn’t get properly hot in winter, and a “star bath” – a cast iron bathtub out in the open with a fireplace directly under it. The star bath was glorious. The fire kept it hot for as long as you like and lying back in a hot bath on a cold winter night watching the stars is one of those major life luxuries. But lighting the bath was chore too far for midweek workdays and much too far for cold, wet, early dark midwinter midweek workdays. When I mentioned “stubborn” in the original article, this was the source. Getting the bathroom right meant going back to fix some fundamental design basics.
It took some years but eventually we reconciled to shifting the kitchen. The north-east facing verandah doesn’t have the view but it is much nicer to sit on. The wet-back slow combustion stove now sits directly under the hot water solar panels and tank, and the kitchen sink and the laundry are a short run. And it meant we could get hot water to the spot on the north-west side of the house that I had always wanted as the bathroom.
So step one is the one I think we all neglect way way too often, and that is to appreciate the utter intractability of physics. Site a house facing the view – or the street – and you will be stuck forever dealing with too hot, too cold, too dark, too much water wasted, too much power wasted, every element that uses heat or light a struggle. Get the aspect right and everything involving heat and light just flows.
When I say “we” for the rest of this post, I really mean my partner Lewie. He did all the work on this building project and gets all the credit.
Step two was a bobcat to dig a trench along the uphill (north) side to take the drainage pipe, and also a length of ag pipe to take storm water runoff away. Drainage pipes for the bath, shower, and basin were laid and the trenches backfilled.
Step three was to concrete in steel corner posts to take the roof and some extra steel posts to help stabilize the gabion walls.
Step four was to build a post and beam roof covered in alsynite.
Step five: install the shower tray and the floor. The floor is diamond grid – recycled plastic interlocking grid – filled with smooth pebbles. We’ve since started using diamond grid for paths and drives too – it’s an excellent environmentally friendly material for stopping wet, trafficked areas getting boggy. It has worked brilliantly in the bathroom No shower mat needed.
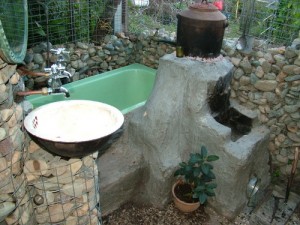
Step six was to install the bath and its rocket stove. The bathroom now has reliable hot hot water year round, from the solar panels in summer and the wet-back slow combustion stove in winter. The only time this system fails is if it is cold and overcast and we have been away for a few days and the stove hasn’t been lit. But the star bath spoiled us – I wanted to keep that experience. I’m going to write a whole nuther post on its own about the rocket stove construction, because we found that there is not a great deal of information on the internet about using rocket stove technology this way, and there was a great deal of learning done along the way. The short story is that it allows us to fill a bath with lukewarm water, light the stove with a small bundle of eucalypt sticks (kept in a big pot next to it for that purpose), and an hour later have a hot bath. The chimney goes all the way under the bath keeping it warm for as long as you are prepared to add a few sticks every half hour, and we still have the view of the stars albeit not directly above.
Step seven: The gabion walls for the three outside walls (the forth wall is the door to the house) and the shower cubicle. We used 1.8 metre galvanised grid wire with a 50mm by 75mm grid. Two parallel runs about 30cm apart, around the outside of the steel posts and back around the inside, tied across every metre or so with heavy galvanised wire to stop it bulging, then filled with river rocks. We bought the rocks from a landscape supplier (along with the pebbles for the floor) and bucketed them into the gabions – slightly heavy work but the area is not too large and it only took a few hours to do.
The walls are filled to head height around the shower and two walls, but lower in front of the bath to allow a view over the garden and to the stars. It works for us because we have no neighbours on that side and the bath is designed for use of an evening when no-one is out and about in the garden.
Step nine: plumbing: We used retro style plumbing fittings, mostly recycled, and got a plumber in to connect the system to the hot water storage tank, which now sits on the roof directly above where I am standing to take this photo. It means it is a nice short run and I can use the small amount of water it takes before it runs hot to water the plants. The out plumbing goes to another bathtub down the hill a bit, filled with gravel and reeds to filter it, then onto a clump of banana palms.
Step ten: Art deco light fittings found at the dump shop, refitted for 12 volt, and towel hooks on the forth wall.
Step eleven: plants. I have very tall native ginger and banana palms around the outside on two sides. The ginger is flowering now, hanging great heavy flower heads into the bathroom. It is dense enough to be an effective privacy and breeze screen. There are a couple of big pots with figs, hanging baskets of orchids and ferns hang from the roof around the edge, and I’ve planted around the edge at floor level with lilies, palms, and bromeliads, and crow’s nest and maidenhair ferns around the edge of the shower tray. A jasmine and a honeysuckle vine both climb the outside of the wire and make their way through the rocks occasionally.
And finally, decoration. One of the (many) nice things about rock walls is no fire danger, so there are candle holders poked into the rock walls, and I’ve started adding shells and sea glass and crystals and pretty rocks when I find them. My two-year-old grandson, Teo, helps me find shells, and made a decision on his own to add some treasures to Grandma’s bathroom decorations.


I think you bathroom is absolutely perfect. I never get tired of looking at the photos of it. If it were my bathroom I’d spend all day in it! Do you ever have a problem with mozzies or that enormous snake?
Thanks for the detail, Linda, I think it looks excellent.
I totally agree about starting with the basics (physics) and working from there, though I do think that compromises need to be made in a retrofit situation. We’re looking at doing some work in our kitchen at some point, partly because it’s a 50s kitchen and not designed for more than one person, and partly because of the flow and use patterns of the house. It’s a bit overwhelming trying to think through all the factors though!
Thanks again for sharing your ideas/thoughts,
-Angus
I think your new project could be starting up an S & B, Supper & Bath instead of the usual B &B.
Hi Jane, we have mozzie nets over the beds in summer, but the microbats get most of them. For a while, when he was a teenager, our son had a microbat living in his closet, hanging upside down from the hanging rail all day and coming out to hunt mozzies at night. Meant he could never close the closet door. We have one swoops around our bedroom of a summer night. With a big dam in front of the house and tank water, it’s hard to get rid of mozzies altogether, and I don’t know that I’d want to even if I could – the microbats and lots of birds feed on them. I hope there’s a vaccine for Zika before it gets this far south. In Florida, they have been aerial spraying Naled, an organophosphate, to kill mozzies in the hope of controlling Zika. The snake is just now waking up from its winter hibernation. It’s a carpet python and not dangerous.
Hi Linda,
I have a garden umbrella which is not used because a little bat lives in it.
I was thinking of mozzie problems in the bathroom and wondered if the python ever fancied a star bath. I don’t like the sound of that spray you mentioned, a vaccine l think I would pin my hopes on, given that we have not managed to spray mozzies out of existence so far.